Thursday, March 6, 2014

Surrealist Painter Adrian Borda


Hello LWAYA Readers,

A couple nights ago while trying to decide what to post, I came across a painting that looked familiar, but not too familiar. It seemed Dali-esque, only more modern and maybe even more strange. Ok maybe not more strange, but I'd say the strangeness is on par.


So naturally after seeing a piece like this, I had to figure out who the creator was, and what else had come out of their crazy imagination.Turns out the man who painted this, and many other paintings similar and not so similar, is a man from Romania by the name of Adrian Borda. His subject matter and imagination are alike in the fact that they're both everywhere! 
Like this impaled pomegranate...


Or this concerned kitty...


The only information I gathered from his website, other than Adrian's name and birthdate, was that he did indeed study painting in college. So it made sense to me that I saw the Dali influences. 


As well as maybe some inspiration from Mark Ryden...


...and Gustav Klimt? 


Sometimes I feel others mistaken being inspired for being a copy cat. Although it's easy for elements in Adrian's art to remind me of others, it's truly amazing how he's made every piece his own. Although the first painting I posted looked to have Dali like qualities, it obviously wasn't a Dali, and had it's own originality. Right away I could tell I had stumbled across a modern artist. What I'm saying is- I've been inspired by Adrian's use of his inspirations. 

To check out more of his paintings, and even his photography go to : 
http://www.adrianborda.com

To buy prints of some of Adrian's work go to: 
http://borda.deviantart.com

Now, I want to go paint creepy clownish girls and loud mouthed brass.

-Mia


Monday, March 3, 2014

DIY: Turn an Old Sweater into Leg Warmers and a Skirt, No Sew!

Ok some of you may be wondering why I would post a winter outfit tutorial in March. To answer your question I currently live in Northern Pennsylvania, where it's still super cold, like 8 degrees cold. Also, I made these in January, ( when it was even colder at nights!) :


Since I made these a few months ago I used the app I mentioned yesterday on the blog, Tayasui Sketches, to draw out a tutorial for the leggings above and to demonstrate what I made use of with the other part of the sweater. I'm not particularly a good sewer, (I can handsew stitches that won't be totally visible,) so a no sew project is right up my alley. I did the best hand sew job I could to add a cute  cuff to the leggings. If you can sew, I think this would be an even better project. Both the skirt and leggings could really be spruced up!

DIY, No Sew, Leg Warmers/Skirt Set:

1. Go to your local conisignment shop, Salvation Army, Goodwill store, etc. Find a cute printed sweater,  or a solid one to spruce up, and check the tag to make sure it's made of any sort of animal wool. Try to get 100% wool, but I found 80% works too. If the tag checks out, make sure it's slightly larger than what you'd normally wear. If it cute, wool, and a lil big, proceed.


2. Wash your sweater on warm, then rinse on cold. This will help it felt better in the dryer. Dry your sweater until it is a desired felted feel. The fabric should be much firmer than before. If it's cut with a sharp pair of scissors, ( I got a pair of fabric shears at Wal Mart for $4,) it will be simple to cut a straight line. I eyeballed it since I was sewing a cuff on, but if you decide not to do any extra, like the maroonish pair above, you could use washable marker and make a line directly on the sweater.


3. Mark, or don't mark, and cut the sleeves off the sweater. These will be the leg warmers. Next cut the body in half, from under each armpit to the other pit. The lower half will be your skirt. Save the upper scrap for future projects if you'd like.


4. If you decide to keep the previous sleeves, now leg warmers as is, congrats! You're finished! All you have to do now is throw on some tights a cute tee and you're ready for the skirt. I folded my skirt over about an inch or less and belted it. But if you're crafty, I think a folded over waist band, or some elastic at the top would be a good idea. E-mail the address below with your own version of this project, your fashion creation, or any other inspiration! 
-Mia


Comment or Email me at:
Mialynn90@yahoo.com


Sunday, March 2, 2014

First Post/Tayasui Sketches

 Hey all!

This is my first post on my brand new blog that I haven't been working on nearly hard enough. But, I couldn't wait for it to look " all pretty" before I shared with you my new found obsession. Not art, that's an obsession that's been mine for as long as I can remember...but an app on the iTunes Store called "Tayasui Sketches"*.

There are all sorts of different tools including but not limited to your everyday pencil, pen and, fancier tools such as a pattern maker that when you draw the outline of an image it fills the image with stripes, polka dots, even colors in different transparent gradients.


It's taken me about 3 to 4 days to understand the capacity of the tools this far, and I know I've just scratched the surface of this apps potential. Wether your a digital artist or you need to put your ideas out before moving to canvas, this app is an easy, mess free way to create. Not only is it mess free, (great for kids,) but it's free free. There are way crappy apps you'd pay for so why not give a freebie a shot! Here's my sketches day 1,2, and 3. Download the app, email** me your sketches, I'd love to see 'em. Or, let me know if there are apps you like better, or find handy!
-Mia

"Sketches" Sketch 1
Super "sketchy", but I thought she was a cutie


"Sketches" #2
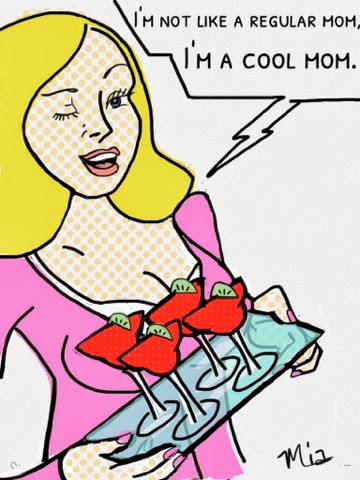
Mean Girls and pop art inspired
Little less "sketchy", figured out the use of the "dotted" tool- sorta


"Sketches" #3
Really getting the hang of the app and the "dotted" tool


*"Tayasui Sketches" Website : http://www.tayasui.com/tayasui/SketchesApp.html
**Send creations and inspiration to : mialynn90@yahoo.com